| Depletion Thoughts #1 - Sunk Costs and the Endowment Effect | The Oil Drum: Campfire | Depletion Thoughts #2 - On Octuplets and Lifeboat Ethics |
Practical Passive Solar Renovation - Part 1: Easy First Project
Posted by nate hagens on February 11, 2009 - 7:12pm in The Oil Drum: Campfire
While you are absorbing the fundamentals of passive solar design, you might also be itching to put some of you new found knowledge into action to realize lower energy bills, help a son/daughter with a school science project, or simply have a winter project to occupy you enough to keep you out of the Mayberry jail. With that in mind, the first project we will look at is one that has applicability across a wide range of homes, whether owned or rented. And if you move, you can take it with you. You can even configure it as a solar dehydrator for your garden and fruit tree produce. And once you gather the materials, you should be able to put it together in a couple of hours.
Before you jump on this fun project, though, make sure that your home's significant infiltration points have been sealed. On a windy day, pass a small candle (or punk or even incense stick) around all of the penetrations in the house shell, such as the windows, doors, foundation sill, wall joints, fireplace, even electrical outlets. Whenever you see the flame/smoke shift, you've found a leak. Discovering leaks on the downwind side of the house requires more careful attention, but is still very important. Warm humid house air that works through infiltration points in walls can lead to condensation in the cooler insulation, lowering the insulating value of the wall and leading to mold problems. There are many ways to seal infiltration points, including tube caulk, string caulk, weatherstripping, expanding spray foam, and others. We'll cover this in more detail in a future article, but make sure you seal the major leaks first. Once you've done this, and have reasonable amounts of insulation, let's jump into the project.
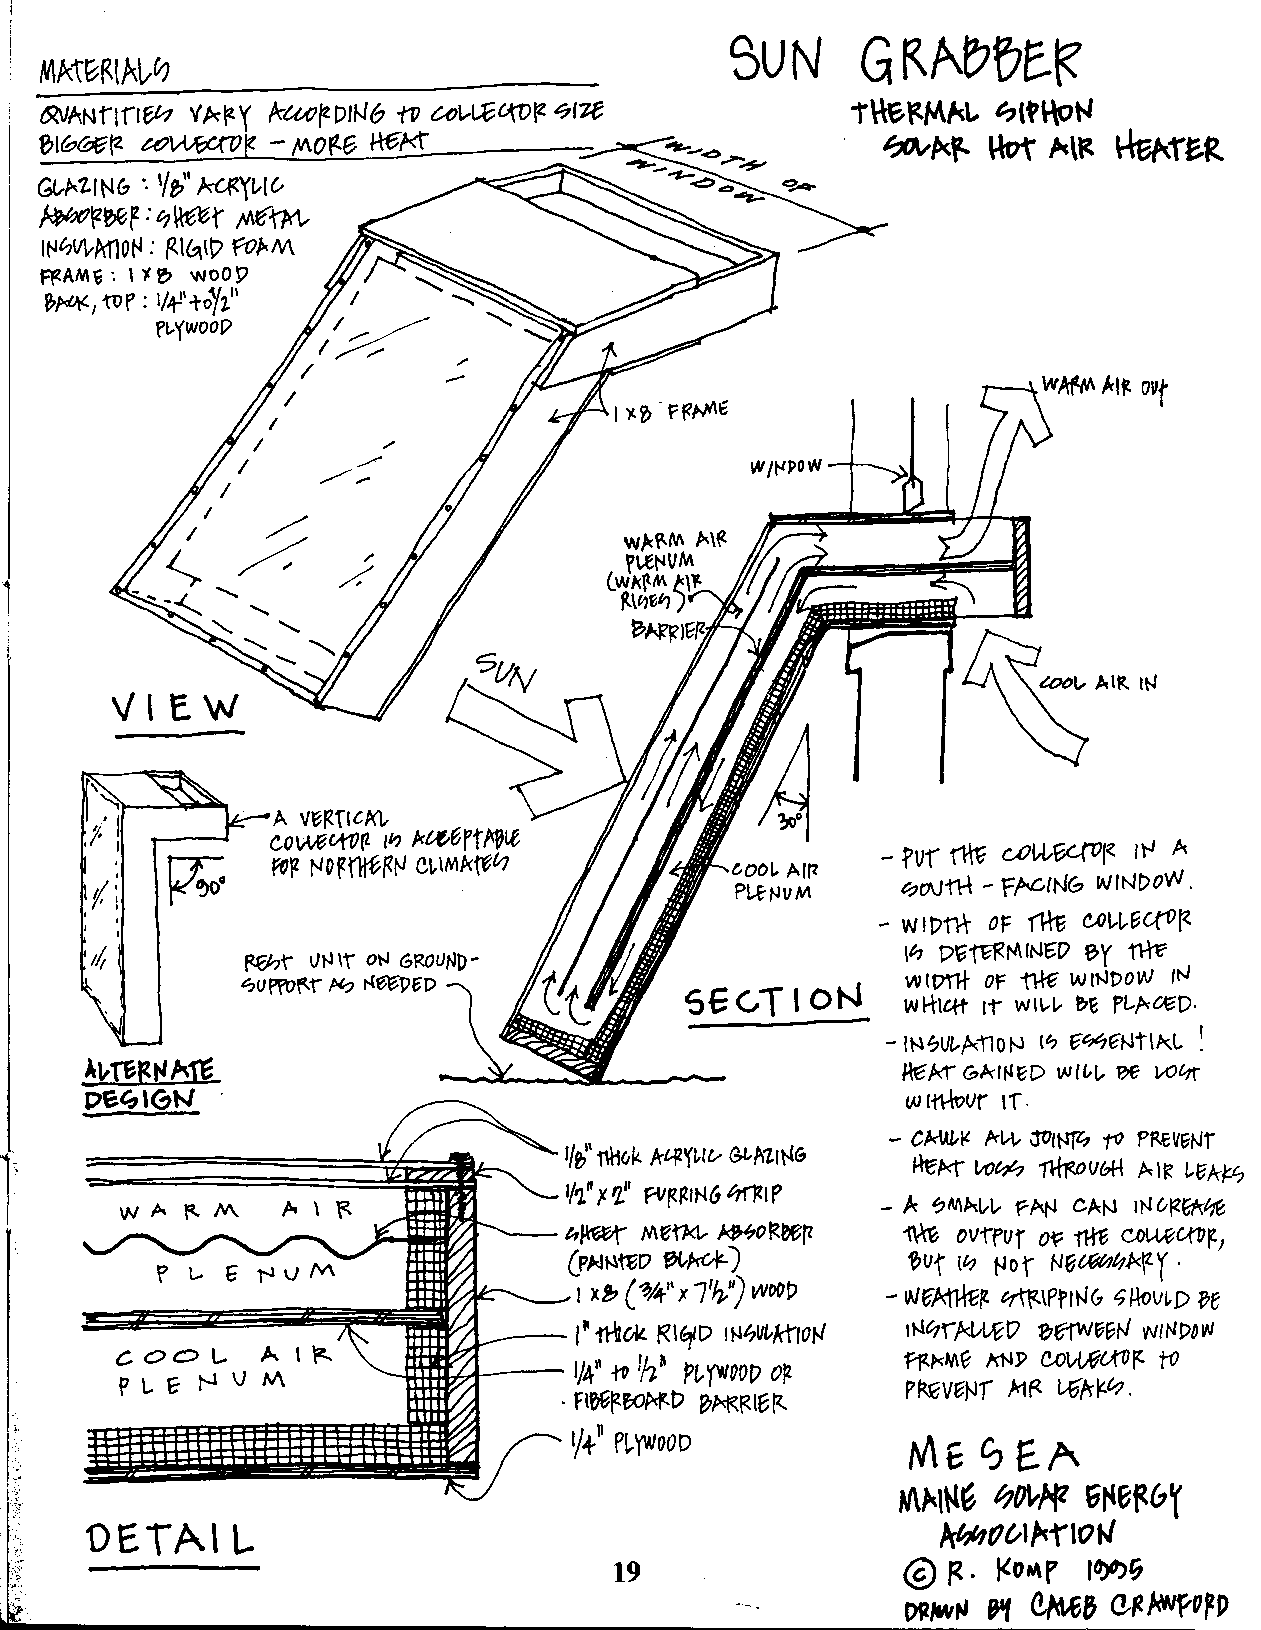
This project is about solar windowbox heaters, which you can insert into a equatorial-facing windows to collect solar energy in the form of heated air that is thermosiphoned into the interior. I built one of these in the early 1980's (live in a passive solar house now) using primarily scrap materials; one side of a sliding door set (a 6' x 3' dual pane door), salvaged lumber, and cardboard for insulation. It went together in an afternoon, and was pumping warm air into my parents house the next day. Let's look at one from Richard Komp's Maine Solar Primer, found on BuildItSolar.com (click to enlarge);
There can be any number of variations and substitutions; indeed, other plans exist at Mother Earth News and J.R. Whipple. These are a few lessons I learned when building mine:
- Used windows can normally be easily found, just look for them (window replacement companies, for example); if you can get more than 1, consider making more than one windowbox.
- The interface between the windowbox and the window frame it is inserted into must be carefully sized and well-sealed (weatherstripping, etc) to prevent infiltration leaks.
- Use good exterior caulk (silicon) or other infiltration seal between all exterior lumber joints
- A short drape of modestly stiff material can be fashioned to the intake to draw the cooler air from floor level.
- A heavy window like a sliding glass door must have ground support of some kind (e.g., staked supports or resting on the ground)
- A good rule of thumb is to design for a tilt of latitude plus 15 degrees (e.g., at 39ºN, the tilt should be 54º), though make sure to take ground height into consideration.
- Using a felt or similar weather stripping between the collector window and the window box frame makes it easier (less messy) to take the window out if needed.
- If you don't want to drill through the window frame to secure it to the window box frame, dimension the frame so that the window fits down inside it on a 1"x1" (2cm x 2cm) lip for a gravity 'fit' with a strap or similar restraining device.
- Careful not to get a 'heat mirror' window that has a low SHGC; these reject most of the sun's energy. Plain glass would be better.
- Strengthen the dogleg joint with a decking joint brace or similar.
- While rigid insulation will work, I used layers of cardboard as an insulator on the insides of the lumber pieces, and between the cool plenum and hot plenum.
- If you plan to use it for a solar dehydrator as well, design that aspect at the same time. Some people build tilt-adjustable frame with wheels on the larger size dual-purpose window boxes.
- Paint it to blend in with the color scheme of your house, in order to enhance its aesthetic appeal
- If you are in a Homeowner's Association, or other restrictive covenant, find out if you are allowed to do this first. It's often better to work with the system and get an amendment to the bylaws that allows "solar collectors and passive solar improvements" than to fight a hostile architectural committee that is miffed you didn't at least ask first.
Note that the thermosiphon effect stops when solar insolation drops in the evening. The air left in the windowbox cools, but does not enter the house, as there is no reverse thermosiphon effect with this configuration.
We'll be looking for comments from those who need more information, or those who put them together and can share their experiences.
Contact
- campfire at theoildrum dot com
Personnel
Archives
- November 2010 (4)
- October 2010 (4)
- September 2010 (4)
- August 2010 (6)
- July 2010 (6)
- June 2010 (8)
- May 2010 (9)
- April 2010 (9)
- March 2010 (8)
- February 2010 (8)
- January 2010 (9)
- December 2009 (8)
- November 2009 (7)
- October 2009 (7)
- September 2009 (9)
- August 2009 (9)
- July 2009 (9)
- June 2009 (8)
- May 2009 (9)
- April 2009 (9)
- March 2009 (9)
- February 2009 (9)
- January 2009 (9)
- December 2008 (4)
The Oil Drum: Local archives
- November 2008 (1)
- August 2008 (1)
- July 2008 (4)
- June 2008 (4)
- May 2008 (3)
- April 2008 (1)
- March 2008 (1)
- February 2008 (2)
- January 2008 (2)
- December 2007 (4)
- November 2007 (4)
- October 2007 (6)
The Oil Drum: New York City archives
- September 2007 (3)
- August 2007 (2)
- July 2007 (3)
- June 2007 (8)
- May 2007 (1)
- April 2007 (8)
- March 2007 (2)
- February 2007 (3)
- January 2007 (5)
- December 2006 (5)
- November 2006 (12)
- October 2006 (10)
- September 2006 (9)
- August 2006 (14)
- July 2006 (15)
- June 2006 (11)
- May 2006 (18)
- April 2006 (35)
- March 2006 (14)
- February 2006 (13)
- January 2006 (12)
- December 2005 (17)
- November 2005 (13)
- October 2005 (25)
- September 2005 (36)
License

This work is licensed under a Creative Commons Attribution-Share Alike 3.0 United States License.
And I'm including more links to solar food dehydrator plans from BuildItSolar.com so that those interested can gain a better understanding of the considerable overlap the two projects have.
I'll also note my suggestion to use a used window is really for those who want to put together an inexpensive unit; there are several glazings to consider.
Nice plans Will, thanks.
I've built 7 solar boxes for our house over the last 7 years.
One group of 4 is simply 4 panes over darkened metal in a wood box, with holes in the bottom of the wall for air inlet, and holes at the top for return.
We do hook up a small 12V computer fan to each return box (4 total), powered by a small PV panel, and it does assist quite well. Of course when the sun's not shining they don't turn. These 4 panels will raise the temperature over 20 degrees above ambient, which is pretty nice for a large unheated workshop.
My first heater I built out of scrap glass, metal and wood. It has an interior small 120V variable fan which allows pretty accurate heating coming in. When the box temp gets up to about 100 I turn it on and adjust so that it gives a constant 80 Degrees.
BTW, do not use that sealed double-layer glass, as the temperature changes will break the glass, as I soon found out.
My 6th box is built from nesting evaporated milk cans, formed into tubes and spray painted black. I measured over 200 degrees static on it and used it last year to dehydrate the tomatoes from the garden.
My current working box is built from blackened beer cans (I drank them only for science purposes...) which set into that filon-type fiberglass corregated solar greenhouse stuff. I did not drill holes in the cans, as there is enough space around the cans for the air to flow adequately. They are held in place by the pressure of that rigid shiny covered insulation board pressing from the back, and that also provides a space behind for the colder air to inlet. The outer air exhausts at the top. While it is not completely finished yet, the fiberglass and rigid-insulation were less than $50, which I suspect will pay for itself in one sunny season.
The nice thing about these boxes is that they can be modified to fit into both horizontal or vertical-opening windows, with a little simple duct work.
Never have figured out the heat gain from all these, but ideally a square meter of perpendicular surface will receive almost 1 HP of heat. We know, tho', that it is in the end much less than that.
All of my heaters, except one, are perpendicular set up against the south walls.
Total cost for all of these has been for flat black paint, and the rigid insulating board, as most of the other stuff we have scavenged over the years.
The Mother Earth News years ago wrote about inexpensive heatboxes, and I believe they were thermosiphoning also. Thanks for the link to JR Whipple, will check it out.
I do a lot of experimental solar and would be glad to share ideas and learn more.
Craig
PS, Nate, are you going to post my contribution to the Campfire "Household Dry Food Cooking" which was a supplement to Jason Bradford's great post on Jan. 23, or does it need more editing on my part? Looking forward to discussion from it...thanks.
sorry - can't keep up - world moving too fast. Jason or I will format it for next Wednesday. I see it in inbox.
Craig,
Excellent work, we admire your initiative! The solar collector style you've referred to is related to tonight's project, and will be the subject of a future post (email me).
Could you estimate the savings you would realize if you would have heated with natural gas instead? What are the dimensions and how well insulated is the workshop?
Dear Will,
Our slab is about 22 by 30 feet. The workshop is not well insulated, but we did put some fiberglass in the rafters.
The slab is uninsulated around the perimeter, so it really sucks out the heat. If we were to dig it up around the edges and put in some rigid foam down about a foot, it would help a lot.
Also, it's really hard to calculate because here at 4500 feet in Reno, we do get some outstanding solar days, but also lately (climate change?) often get many days where it's cloudy. We used to have sun most every day here when I was growing up. Nowadays it's hit and miss.
The second year after building the 1st four panels, I took off the glass and painted the BACK side of the metal flat black also. This I've read allows better heat transfer, but I'm not an engineer and my math sucks.
The sheet metal is BTW offset from the wall by washers to about half an inch. This gives, I believe, double the surface area of the sheet metal, instead of having the air flow only over the front side.
I measured 146 degrees one day static at the top of one panel.
It was a quick and dirty job, but cost very little, and didn't take a whole lot of time to put up. I did learn, however, before drilling 3 inch holes in your wall, be SURE to see that there is not a stud right behind it. Also any (live) electrical....
I'm excited about solar thermal. IMHO solar PV is for the wealthy. Using solar hot air and also solar hot water is far more $RO$I, than Photovoltaic, and it is much more friendly to community manufacture, and creating jobs and energy savings quickly.
I'm also very interested in building neighborhood sized focussing parabolic reflectors, which could in theory provide steam, or great heat for Stirling and Ericcson hot air engines, as well as providing hot water as a waste product from the engine cooling requirements.
I've got a 1 M parabolic, and it is truly a scary device.
I wouldn't be surprised if it were possible for a neighborhood group to build a large enough solar furnace to be able to smelt small batch aluminum and other soft metals.
Thank you folks for this Campfire post, this is the kind of stuff that I like to get involved in. I enjoy reading all of this site, but have no expertise in much of anything other than campfire.
Will, I'll email, thanks.
Also, Nate, Please forgive me, I really should learn a little more patience.... I apologize.
I love this site.
There are nice examples on YouTube that I've posted before.
Cheers
...world moving too fast...
Relative to the sun, the earth orbits roughly every 365 days. At 93 million miles away, that equals about 66,705 miles per hour (on average, due to the elliptical nature of the orbit).
Then if we consider the sun's orbit around the galactic core every 250 million years or so, and the distance from the galactic center of 7.62±0.32 kpc, that equals about 475,200 miles per hour. The Frequent Flier Miles are beginning to add up quickly.
The Milky Way is moving at roughly 1,360,800 miles per hour relative to the local co-moving frame of reference that moves with the Hubble flow. And this doesn't take into account the relative velocity of the Milky Way to the Andromeda Galaxy, with which we will collide.
Then if we consider how the local cluster is falling at about 2,160,000 mile per hour toward the Great Attractor (Norma Supercluster), which is pulling in millions of galaxies, including galaxies on the far side, we'll throw in the towel and call it a night(cap)...
http://www.youtube.com/watch?v=JWVshkVF0SY
The little cpu fans can do a lot. I use one to inflate my double skin greenhouse. The greenhouse is only 24' x 18' but it actually does it. Here's a link to some pictures of it http://tinyurl.com/cwelkh . the first pic is of the inflated greenhouse and the next 3 show the fan and etc.
I suggest a small modification to make it more efficient by sucking colder air near to the floor:
Agreed, just one more small step in the assembly. That's why I had a similar point in the article;
* A short drape of modestly stiff material can be fashioned to the intake to draw the cooler air from floor level.
Your illustration better communicated this concept, thanks!
This modification makes the sun grabber virtually identical to
Larkin's anti-reverse siphon solar air heater
David, you're right,they are very similar. The key differences are the solar windowbox adds more solar collection area above what a window already has, and can be removed during non-heating seasons (and used for food dehydrating). We will cover wall mounted passive collectors in another article, so stay tuned.
Will,
From your above comment I am getting the impression that this apparatus is removed for the part of the year that one does not need additional heating. Is this correct? If so, how much on average do these things weigh. I am thinking of the effort of carrying them, durability if they are moved often, and then one needs storage space. Logistics!
Wyo
Wyoming,
Good point; some people may prefer to leave them in place. In that situation, having a summer vent (see figure) not only discards any heat gain, it acts as a solar chimney and pulls air from the house, a desireable effect on those hot, windless summer days (make sure to block the heated output that normally comes into the house in the winter). This approach is an extra detail from the James Dulley article;
Another trick is to use a piece of poster board or thin cardboard as a turning vane to reduce the turbulence at the bottom of the collector, helping to 'bend' the airflow in the reverse direction;
could you please explain what the material of the barrier is made of?
nice drawing by the way.
The barrier in this drawing is made from 1/4" to 1/2" plywood or fiberboard (see detail on lower left of diagram in the article). I added a layer or two of cardboard to the cool side to reduce heat transfer from the warm side to the cool side, strengthening (perhaps only slightly) the thermosiphon effect. A 1/2" of firm insulation should work as well.
A very good idea but I have an even easier project for 'winters' here in Queensland, Australia.
Open the curtains during the day and close them around 5pm when I got back in from work. It maent a nice hot room even if the temperature went down to 10C overnight.
Conversely, in the summer, the curtains are kept closed during the day and opened in the evening.
A good idea indeed, especially with insulated shades. Of course, you can still do this to a window with a solar windowbox installed.
For a split-second, I actually thought that this space heater didn't yield any benefit over a window with decent blinds. Of course, it does: It's passively automatic and is additional heat collecting surface area. If your home has significant thermal mass (as the home I'm constructing does), these could be a real winner.
Mark, there are some people who have put something like this directly behind a window. In such a situation, no additional solar heat is actually gained into the house, and less daylighting is available.
Agreed. Even so, there would still be a benefit in that night-time heat-loss is severely restricted. For our house-to-be, which will likely have no active automatic heating initially, a few similar interior window-mounted heaters could allow us to visit family for a winter week with less to worry about. For an unused room with a south-facing window, such a heater would also be a benefit.
You could also use insulated shades (which are nice to have regardless), which also restrict night-time heat loss. You could leave the solar windowbox heater 'running' while you were at your family's place, and have the shades drawn.
Note that when leaving on a trip with an interior windowbox, you would need to leave it blocked up to prevent reverse thermosiphon from sundown to sun up (unless you had an automatic means to enable unblocking when the collector warmed up on sunny days).
Will;
Thanks for offering up a hands-on project. I've been building this one ( http://www.builditsolar.com/Projects/SpaceHeating/Kreamer%20Air%20Collec... ) from another Mainer named Bill Kreamer. It's come together in fits and starts between too many other things, but I'm hoping tomorrow it gets switched on!! Built the last piece of connective tissue today (a gate which closes off the insulated airway to the roof, so it doesn't drop cold air in at night).
Instead of a flat plate for picking up and for exchanging the heat, he uses a dark filter fabric which the air moves through for a more complete exchange.
I've made mine a roof-mount instead of Southern Wall, so I had to run insulated ducthose to it and deal with penetrations, etc.. and I also built reflective barndoors onto it, to keep it sheltered in warm weather, and getting a concentrated dose when they're open.
I'll try to report in when the fan starts spinning (and if there's sun!)..
Bob
where does one get the "Black polyester felt" ?
does it come in different gauges ?
The pdf talks about it too.. I actually just bought 'polyester black felt' at a fabric store. The designer says this has served him well without breaking down noticably over several seasons. His other suggestion was to use air filters for HVAC systems, and paint them black. Even with his suggested breaking in period, I didn't really want to have a steady stream of Krylon offgassing into my house. I suppose there will be some kind of natural fiber material that could work as well, but I haven't taken on that quest yet.
The 1/16" (?) thickness of regular felt he feels is adequate, just enough to catch most of the light hitting it, while the back wall is foil-faced foam insulation, and would reflect any spill back into the material for another pass as well.
His main claim of efficiency is that this 'massively paralleled' thermal transfer forces eddies and currents around the tight fibers which breaks into the natural boundary layer that insulates objects in a fluid or gas surrounding, making for more thorough conduction of heat. He also says this has the result of making the unit effective at much lower operating temps, and thus less wear on the components.
B
The felt ,or screen or other , needs to be porous enough to allow flow through it but not let any solar energy escape. Hopefully any light passing through will be captured when it is reflected off the back wall. The idea is to get as much of the energy into the porous absorber and transferred to the air
I have also heard that it is better to have the porous absorber on a slant so the hot air flows on the back side of the absorber and away from the glazing to reduce heat loss through the glazing.
I would think that felt would loose less energy at night..... More of an insulator than metal
Like so ...
http://www.flickr.com/photos/10162336@N06/3223891695/sizes/l/
RE: Solar energy escape.. The dark material would radiate only into the box itself, where the airflow (this is fan-blown, so not passive thermosiphon) takes warmed air back into the house.. still, the glass facing would lose heat at night, but his design defeats thermosiphoning household air out into the box, and he suggests one might want to just shut the duct down at night anyway.
His airflow setup runs the house air into the front, glazed chamber, and it pushes back through the collector material into the rear chamber, where it exits to the second duct and returns into the living space.
(The PDF is longish, but explains his reasons and the results he's gotten better than I can. Well worth reading.)
I did get the last pieces connected today, and ran the fan, but at 4pm in Feb, that's not likely to yield anything. Supposed to be cold and sunny tomorrow!
Bob
OK, Hazy Sun and Cold 26F outside, 20mph winds in Portland, and I opened the gates and turned on the fan at 9:45am, and immediately started getting 80 degree air at the output register! (raised some 12 degrees from the 68 ambient in the house)
It's running on a 12v battery right now, so I still have to hook up the PV panel, and if we hit clouds, it's temp switch is not inline, and so it could blow cold air just as easily. But it's a good start!
Bob
Don't forget that when your window is partly opened to accept this, that you should seal the gap between the upper and lower sashes as well, or you'll be looking at a big air-exit space.
Excellent point. I remember using weatherstripping with adhesive on one side in multiple layers, though the last layer took some patience.
i have done something similar to gain solar heat for my house, but that was not my initial purpose.
i built a 7x7 greenhouse on a southern exposure wall & was able to incorporate 1/2 of a sash window in my living room, & a basement window also.
my initial purpose was to be able to get household heat to seedlings in the greenhouse during coldsnaps. But on a sunny cool day the opening of windows to my house puts in our house an amazing[to me] amount of heat , & keeps the seedlings from overheating. Typically i don't keep the windows open to our house.
the one problem i have in the height/position of my greenhouse relative to my house/grade required to incorporate the windows means i get water standing in my greenhouse after rains; but this problem is solved for now with boots. i hope to put in a drain; but overall the ease of heating the greenhouse from my woodstove heated house or heat my house with sunshine is well worth the difficulties.
i have only scanned Will's series, but remember his diagrams that used setups similar to mine for heat.
Post-Peak Wood Joinery
If anyone reading this decides to built this and other projects, like a solar dehydrator, I recommend the Dowelmax joinery system. This little high-quality tool is fantastic for making wood joinery strong and seamless, and even a child can use it. With the right glue, a dowelled joint made with this tool is far stronger than a nailed or screwed join, will not rust, and is best for exterior applications like the one under discussion.
Dowelmax
This really is one of the best post-peak tools you'd want to have.
Dowelmax Joint
(Note: picture shows maximum use of dowels; most joints only use 2 or 3 dowels)
Solar Dehydrator
Some points to think about:
1. The use of double glazing improves effectiveness of insolation as it reduces heat losses. The double glazing will add considerable weight to the device. If double glazing is not professional grade (i.e. proper vacuum sealed) it is susceptible to moisture penetration which will at some point condense (creating mist, perhaps mold) thus reducing solar penetration and transmission while reducing its thermal insulation characteristics.
2. The device (depending on size, glazing, construction and overall weight) will need some proper support. The weight of sash window will be inadequate; danger during high wind periods.
3. Cold air infiltration through all gaps (between device and window frame as well as midway though sash) has to be eliminated, otherwise there is a good chance heat losses will outweigh any heat gains.
4. Aluminum backed insulation will reduce heat losses (long wave, infrared spectrum)
5. Black paint on metal absorber must be mat. Special, high absorptivity paints are also available.
6. Air intake from lower point is very good idea. If sash window is single glazed (as shown) cold air off the inside window face may push down warm air inflow this combined with the proximity of air outlet and intake may create closed loop thus reducing efficiency. It is always good idea to keep air intake and air outlet as far away as possible.
7. Use of fan is risky; may circulate air faster than needed thus cooling air instead of heating. Fan running on photovoltaics may operate with diffuse sky even when there is not enough sun to heat air so again may lead to cooling.
8. It would be good idea to have some way of controlling air intake and outlet, for example to be able to cut off operation.
9. In general I think similar device developed as a free standing piece, a sort of “garden furniture”, connected to a building by insulated pipes, may be more efficient, controllable, more practical and aesthetically pleasing. Of course you would need to create proper holes for the piping.
10. Just noted that top of device has to be also insulated and or else we have a “cold bridge” i.e. extra heat escape roots. It is also a weak construction detail (potential rain penetration). Such seemingly small details may pose significant practical problems and limitations (cold bridging, air infiltration, etc.) therefore I would highly recommend a free-standing device which basically does not jeopardize a buildings envelope. Hope this is of some help!
You raise some good points, many of which were covered above or covered in previous articles (i.e, flat black [or selective] paint, cold air infiltration, air intake from lower point, and needing proper support)
These additional points of yours certainly merit consideration;
- Controlling the air flow can be desireable, by adding adjustable flaps to either the intake or output sides.
- Dual glazings would be best as a part of an existing sealed unit to avoid condensation between glazings
- Aluminum backed insulation can reduce radiative losses. While these are likely minor, every percentage point gain counts, of course.
- Insulating the top plate (where the warmed air is entering the house) will help to reduce losses.
We appreciate these extra (and reinforcing) tips, which will contribute to higher degrees of success with our do-it-yourself readership.
In terms of having it as a free-standing unit, one must examine the additional heat losses realized by additional ducting both from the house to the unit, and from the unit back to the house. The thermosiphon effect can stall if insufficient or overly lengthy 'draft' exists.
A water-based solution for separating the unit from the house might be more appropriate, where the water was circulated down through a radiator or other heat exchanger. Care must be taken, though to ensure the solar collector is beneath the heat exchanger to enable thermosiphon. See the following figure, and replace the hot water tank with a heat exchanger that circulates the warmed water in a downward direction (to reinforce thermosiphon). Note that the pipes need to be as short as possible, well insulated, and with a relatively large inside diameter to reduce friction losses;
Hi Will! A water system can be much more efficient, after all, water unlike air, is a great heat sink. A water system though would be more expensive, bulkier and would require more edvanced expertise for building, installation and maintenance. I would still recommmend a type of free-standing unit or unit attached to a wall with a couple pipe connections for air circulation. Well insulated PVC piping will adequately minimize heat losses. Naturally the device must be installed as close as possible to the building. The nitty-gritty aspects of the window installation can be quite dibilitating. It would not be that easy to weatherproof such an arrangement, especially in typical winter conditions. What is holding the sash window-pane locked down and safe? What about security issues? These are important issues that professional designers must aknowledge and resolve prior to suggesting any solution. Just to give you another example, many similar issues exist when considering the benefits of natural ventilation, and so on.
There are any number of sash window locks that can be used, depending on what homeowners want and type of window, for example;
The windowbox I built was supported at the far end, and therefore was not a cantilever, so I had no issues with torsion on the window frame, and the window stayed down perfectly with gravity alone.
We certainly agree about weatherproofing, that's why I had made it an important point above.
It sounds like you have implemented one or more of the approaches mentioned. Can you share some pictures of these implementations with us?
Hi, again! I thought you’d come up with something like that. Nice image. I guess that "sash-block" must be screwed further up the window; it seems like this image shows a closed position without "the device" installed. So basically if you wanted to open the window at some point to ventilate a room you have to have a screwdriver handy. The window in the image is an old wooden type, drafty, single glazed, poorly insulated unit. My point is that the solar window device would probably jeopardize modern, efficient, high-performance, window units (acquired at premium price). I don’t see how one could properly weatherproof the arrangement without ending up with something pretty tacky. I have built a solar hot water collector as an exercise but not a solar heater like this. My knowledge stems from first hand experience in the building industry as well as work &research in environmental design engineering. I really don’t want to be pessimistic about this. Sorry. The principles are fine, its just the window convenience bit, as opposed to other precedents, that is posing some tricky problems. I see further up you mention this could be used as a solar chimney for cooling purposes. That’s a whole different ballgame. For cooling purposes we extract hot indoor air therefore we have more complex issues of air pressure and circulation to resolve. (In the winter/ heating version it is merely recycling indoor air) So basically this window device, if used as a solar chimney type of cooling arrangement it would probably end up heating the space for a number of reasons. ie. A slight breeze would prevent hot air exiting, pushing it instead, back into the building. The way the device is tilted would even help siphon the hot air back inside. Also if this window/device are located in a leeward side of a building the negative pressure would again suck back inside the hot air.
You seem to think that this wouldn't work, though I'll stick with all of the positive reports of people who have actually built and used a solar windowbox heater, of which I am one.
Also if this window/device are located in a leeward side of a building the negative pressure would again suck back inside the hot air.
I'm afraid I must disagree; the leeward side of a house has a lower outside pressure, which would amplify the effect of the thermosiphon to draw air out of the house.
Please review the reply where I explained the solar chimney effect; if one is in an area where there are sufficient breezes from the south, then one wouldn't need to use it for that purpose, or could open another exterior vent on the underneath intake side; in short, there's many approaches to making this work for you. And there are many different kinds of window locks, almost all of which don't need screwdrivers; the one in the picture above falls into that category.
Best of luck on whatever home energy projects you choose to implement. And glad to have you here; I see that you are a new TOD reader, 3 days now.
Sorry I mixed up the leeward with windward! You are quite right. Actually with wind direction often changing that would be a rather unpredictable situation. Wind forces can be very detrimental to any "solar chimney" type operation. They don’t have to be strong breezes, which may be used directly for natural ventilation& cooling i.e. opening a window. Actually, stack effect which forces air upwards, in a situation like this device would probably amount to just 0.1-0.2Pa while a small breeze which is barely adequate for cooling (especially if its coming from the south) can amount to several Pa. So, even the smallest breeze will cancel out stack effect, if the air outlet is fixed.
I am actually very interested in learning more about this device and getting more data that would provide some basis for a little more objective review of its operation. Certainly the principles are there and the precedents it is based upon are well documented. So please provide some more info like typical indoor area, number of devices, indoor/outdoor temperatures. etc. I am thinking of building my own version, perhaps in summer, then again I think I am keener on the dehydrator! In terms of energy efficiency, nothing beats good and plenty of insulation. Unfortunately lots of people still consider it waste of money!
One more point I have to make is that testing our knowledge and experiences without necessarily agreeing on everything is not necessarily counterproductive! So I hope my input here was at least though provoking.
Actually, stack effect which forces air upwards, in a situation like this device would probably amount to just 0.1-0.2Pa while a small breeze which is barely adequate for cooling (especially if its coming from the south) can amount to several Pa.
With a southerly breeze, even a minor one, opening the window (or another one nearby) would eliminate any pressure difference that you suggest would overcome the thermosiphon convection. Don't forget that a fluid in motion will seek the least resistive path, and the path through the summer vent, down against the upward convective force of the absorber, turning 180 degrees, then traveling up through the rest of the windowbox and out through the orifice sums up quite a few frictional losses that make it the most resistive path to travel, hence little if any air would travel in that direction. Any fluid dynamics models by you to show otherwise are welcome.
In terms of energy efficiency, nothing beats good and plenty of insulation.
Agreed, if infiltration is taken care of.
I am thinking of building my own version, perhaps in summer, then again I think I am keener on the dehydrator!
One core unit can perform both functions; a dehydrator would simply require a bolt-on drying rack compartment and a stand.
Agreed air infiltration/ air leaks are just as important as insulation! No need to do any complex CFD for basic solar chimney design principles. We are after all discussing in quite general terms, without any specific model basically, doing some educated estimates. The entire south facade would act as a wind catcher guiding air flow in towards the "summer vent door" in the axo sketch you provide. I dont see how any window opening will reduce the effect of wind on a half meter stack. Also opening the window just above that "summer vent door" would lead all that hot air re-entering the space. Wind friction back through the devise would be negligible. Any solar chimney research will point out that aperture size and location are very crucial. Also observe a classic fireplace chimney. Any obstruction near the exhaust and even slight winds there is turbulence, obstruction of stack effect, and often smoke gusts inside the space.
Question about the dehydrator: What is the best surface to spread the various veggies for drying? A metal tray would be easy to clean but would it inhibit max air circulation through the veggies? Would metal (say aluminum cooking tray) be a good solution? Would overheating of the metal during hot, midsummer day actually cook the stuff? A fine screen, on the other hand would probably allow more air circulation through the veggies but would it be hygienic? (galvanized, plastic, etc.) Not sure on cost and availability of a stainless steel screen. What do you recommend?
Don't forget about drying racks that are common in many dehydrators.
Such a solar heater is great project.
Back in the 80s when I was living in a commune we built one of these as an experiment.
It worked out well.
We then graduated to two vertical installations built onto the exterior of two south-facing walls. These were more ambitious. They both remain in operation today. On a sunny winter day they generate more heat than the rooms to which they are adjacent can accommodate. We never installed ducting to try to spread the heat around. But it's so nice an comfy.
One of the nice things about the system is that you do not need fans, or any other energy source.
A great resource is
http://www.builditsolar.com/Projects/SpaceHeating/Space_Heating.htm#Passive
Yes, the wall mounted units are also effective, and can be larger and more permanent. This project was selected for right now due to the quickness with which it can be assembled, and the ability to mount it now, even in the middle of winter. The wall mount units will require more work, and are best constructed when the weather is more pleasant, as holes must be punched in the exterior wall.
We will cover air circulation in the next Passive Solar Design series.
At risk of pushing the bounds of this topic, I wanted to mention an extra possible use of my Hot Air Panel(s). Off-season, when it would be otherwise lying abandoned up there, I am toying with routing the solar hot air into a closet in the Laundry Room, where you just hang up your wet washing and let it dry in there. This might be helpful if you're in a home where yardspace, intermittent rains, privacy or dirty polluted air leave you unwilling or able to hang clothes on a line outdoors. It also means you can hang it there no matter what the weather is.. it'll get it's drying when the sun is ready.
I'm also drawn to the idea if it can be worked out that the drying closet is also the closet, so you are saving a step (so both labor and a lot of energy) in your laundry. That might mean this wet laundry just goes to the bedroom closets, which are 'wired for air'.
There might also be a benefit of not exposing clothes to all that UV, if fading is an issue for you.
Mold, both in the clothes and the walls of this closet must, of course, be considered, as well as venting, either to the house in winter, or outside in summer..
Bob
Terrific contribution!
Thanks to Nate H and Will S for your educational efforts with this.
Thanks also to folks who have added comments.
For myself, I think this project could well be built during this spring as a fruit/veggie dryer and attached to the house this fall.
Excellent invention, thanks!
I did think of an improvement though: put the collector in a North-facing window.
Reason: the sun is in the North, so there is more solar energy in that direction.
Cheers
Will and Oil Drum editors:
Thank-you so much for this article! This is exactly the kind of Campfire article I think would be most helpful to the general public – practical applications that are not too expensive and that a person willing to work and learn can actually build, presented by engineers and other trained professionals. I’m excited to get to work on this project.
My question to you is this: Can this design be adapted to include greenhouse windows? My house has only two windows with southern exposure. My plan was to convert them to green house windows where I could start seedlings (instead of under grow lights as I do now – power down and all that).
Thanks again for a terrific article.
lilith
PS Thanks also to all the knowledgeable commentators - I've copied and pasted much of the advice for future reference.
Will, hammers and saws, now you're talking a language I can understand. Thanks ever so much for your efforts.
How to store the heat for the night ?
Install so it's hitting an interior wall? Might be worth it to put one in if there's not a good location already?
Hah... cool thought: no wall where you want to install, but space to put in a wall, half, wall, divider...what have you. How about a plexiglass wall filled with sand? It could double as a terrarium or something...
Cheers
I'm looking forward to a craft project using the bricks I'm taking out of our old chimneys.. to make massy, brick 'Fireless Places' in the old chimneyshafts, and routing the incoming hot air through them first, then into the room. (Making sure that the outer wall of the chimney shafts are now heavily insulated so the amassed heat stays in the building envelope.)
PS, Day Two of my rooftop box, was able to start by 8:45 am, with output temps from 90 to 116f throughout the middle of the day, about 40f outside. Woohoo! The sun is actually hot, and it heats things up!
With one or two, overnight storage may not be needed (unless in a small, superinsulated house). Homes are going to have an intrinsic amount of thermal mass in drywall, furniture, non-carpet flooring, etc, so you likely don't need additional thermal mass.
If you make several solar heaters, have a small super-insulated house, and/or want to have extra thermal mass anyway and are looking experiment, one approach would be to acquire PCM, and put it in a couple of aesthetically suitable containers on the 'exhaust' side of the windowbox heater. The PCM would be heated by the air at its hottest, so this could be considered almost direct heating of the thermal mass.
I say water
Water is the best thermal storage in terms of cost, though in some cases its weight or containment may be a limiting factor.
The PCM I noted above (Latest 25T) has a latent heat of fusion of 175 KJoule/Kg at 25C (or 75 BTU/lb at 77F). 10 lbs of this material in containers on the 'exhaust' side of the windowbox heater would provide at least 750 BTUs of thermal storage (which is admittedly small) plus its sensible heat storage; 10 lbs of water across the temperature ranges of 65-77F would provide only 120 BTUs of storage (about 1/6th of the PCM storage energy). If one could make arrangements to allow far more weight, as in your current design for your workshop, then water would likely be the best economic choice.